This post may contain affiliate links. Learn more here.
I didn’t grow up making a no knead bread recipe or any bread of any kind. Honestly, I never had much interest in it—until the pandemic, when it felt like everyone was suddenly baking sourdough. Like a lot of home cooks, I jumped in, taught myself the basics, and spent months feeding and baking with a starter. It was my first real experience with bread baking, and while I learned a lot, it eventually came to an end when I finally killed my starter.
That same week, a friend shared the original recipe for this Dutch oven bread with me, and it turned out to be exactly what I needed. I’ve been making this no knead bread recipe for over a year now, typically once or twice a week, and it’s become the only bread we keep in the house. Over time, I’ve streamlined the method, adjusted the timing to fit how I actually cook, and trimmed the instructions down to what truly matters. This post reflects the version I make today—comfortable, reliable, and well-tested in a real kitchen cooking for two.
Jump to:
Getting Started
This recipe uses the cast-iron Dutch oven method, which gives you a beautifully crisp crust without fussing with steam trays or extra equipment.
A few things to know about how I make it:
- I grab my glass measuring cup, add the water and pop it in the microwave for 1 minute.
- I use the largest mixing bowl I own—nothing fancy, just tools that are easy to work with and easy to clean.
- I always use a kitchen scale to measure my flour. It’s faster, cleaner, and more consistent.
- For well over a year, I made this bread without activating the active dry yeast in water first, and it turned out great every time. I’ve only recently started adding the yeast to the warm water first. Honestly? I’m still undecided which method I prefer.
- While the dough rests and rises, I cover the bowl with reusable plastic covers, which keeps things tidy and prevents drying.
Letting the Dough Rise (Oven Light Trick)
I have a double oven, so my routine looks like this:
- I cover the bowl and place it in one oven with the light turned on to rise.
- After about 1½ hours, I start preheating the other oven with the Dutch oven and lid inside.
- Psst – this is the set I currently have. I use the deep pot cooker and then the frying pan go on top as the lid. Or, since my frying pan is almost always in use, I bought a lid.
If you don’t have a double oven, no problem:
- Let the dough rise in the oven with the light on.
- When it’s time to preheat, remove the bowl and let the dough finish rising on the counter, still covered.
- Place your Dutch oven (with lid) in the oven and start preheating.
Same results, just slightly different choreography.
Bake Now or Refrigerate (Your Choice)
At step 5, you get to choose your own adventure:
- Bake immediately and move right on.
- Or refrigerate the risen dough for up to 3 days.
If you refrigerate, let the dough sit on the counter for 45–60 minutes while the oven preheats. I do find that refrigerated dough gives me slightly better ears, but I still get good ones when baking right away—so don’t stress over it.
A Word About Hot Cast Iron (Seriously)
Your Dutch oven and lid preheat with the oven, which means they are heavy and extremely hot when it’s time to add the dough.
Before you start:
- Clear a nearby landing spot.
- Have a trivet ready or a safe stovetop area cleared.
- Grab good oven mitts.
- Know exactly where that pan is going before you lift it.
This is not the moment to improvise.
My Preheat Routine (and Why Timers Matter)
While the oven preheats, I:
- Prep my work surface
- Grab the flour bag
- Lay out a square of parchment paper
- Set out my bench knife
Then I set a timer for 30 minutes and walk away.
There’s a lot of hand washing during the transfer—pan out, dough in, pan back in. As soon as the Dutch oven is back in the oven, I wash the bowl, tools, and counter with hot, soapy water. Raw dough dries like concrete, and future-me always appreciates this step.
No Knead Bread Recipe Ingredient Recommendations
Flour
I only use King Arthur Baking Company Unbleached All-Purpose Flour. I started using it back when I was making sourdough and never looked back. It’s consistent, reliable, and behaves exactly how I expect every time.
Active Dry Yeast
You can use a brand name or a store brand. I keep:
- One open jar in the fridge
- One backup jar in the pantry
Nothing worse than realizing you’re out mid-mix.
No Knead Bread Recipe Finishing Touches
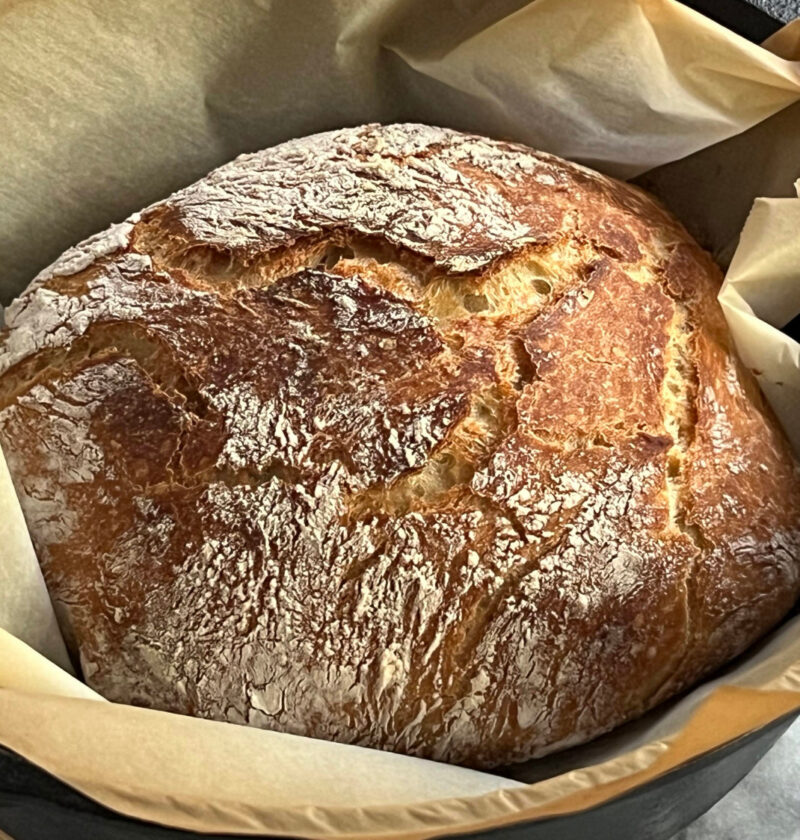
Removing the lid for the final 10–12 minutes gives the bread a beautiful golden crust. Sometimes an ear pops up and gets a little dark—honestly, I take that as a sign of a job well done.
Once baked, let the bread rest 10 minutes in the pan, then carefully move it to a wire cooling rack. Leaving it too long in the cast iron can make the crust overly tough, so don’t skip this step.
I let the loaf cool for several hours before moving it into my bread storage box, usually leaving it ajar so excess heat can escape. And yes—sometimes I move it too soon, and the box steams up anyway. That’s just part of the learning curve.
No Knead Bread Recipe Pairings
This is the only bread we keep in the house, which is why I make it up to twice a week.
- Perfect with butter as a snack
- Great as toast for breakfast or brunch
- Excellent for sandwiches (like this egg salad sandwich)
- Our go-to for simple bruschetta alongside pasta
It’s flexible, unfussy, and always worth the small effort.
No Knead Bread Recipe Leftovers
- Store unsliced in a bread box or an airtight container
- Slice from the middle outward to keep it fresh longer
- Refrigerate to extend its life if needed
You can also:
- Freeze whole or partial loaves
- Thaw in the fridge
- Keep thawed loaves refrigerated until finished
This bread fits real life—and that’s exactly why it’s earned a permanent place in our kitchen.
Want more easy, staple recipes like this one? Join our free newsletter below and never miss a post!
No Knead Bread
Ingredients
- 450 g all-purpose flour
- 2 tsp active dry yeast
- 2 tsp kosher salt
- 1½ c water
Instructions
- Measure water and heat for 1 minute or less in the microwave. The temperature should be between 105-115℉.
- While the water warms, measure flour and salt into large mixing bowl.
- Add yeast to water, stir to dissolve (no need to let it foam), then pour into mixing bowl with flour and salt.
- Using the handle of a wooden spoon, stir until all of the flour is incorporated. Dough will be wet and sloppy – not kneadable, but not runny like cake batter.
- Cover bowl with cling wrap or a plate and leave to let rise for 2-3 hours.
- After about 1½ hours, place cast iron dutch oven with lid in oven and preheat to 450℉.
- When dough is ready, lightly flour a work surface and turn the dough out on to it. Sprinkle a little more flour on top and using a dough scraper, work the dough into a ball by folding the sides inwards (about 6 scrapes).
- Using oven mitts, remove the hot pan from the oven (remove the lid and place in the oven) onto a nearby trivet or stove top.
- Tear off a square of parchment paper. Flip the dough ball onto the square of parchment (smooth side should be up) and then place the parchment and dough carefully into the hot pan.
- Using oven mitts, take the lid from the oven and place on the pan, then put in the oven.
- Bake with the lid on for 30 minutes.
- Remove the lid and bake for 12 minutes more.
- Carefully remove pan from the oven and let sit for 10 minutes.
- After 10 minutes, the bread can be sliced and enjoyed or removed from the pan and left to cool on a cooling rack.